Eye Tracking
The Eye Tracking panel has two parts, and which one you need depends on where the avatar goes:
| Part | Use it for | What it does |
|---|---|---|
| SDK3 Eye Tracking | VRChat avatars (Avatars 3.0) | Rotates the eye bones so that setting up eye look in Unity is simple. |
| Legacy Eye Tracking | ChilloutVR and other games that still read the old setup | Builds new LeftEye and RightEye bones and the vrc.blink_* and vrc.lowerlid_* shape keys. |
SDK3 Eye Tracking
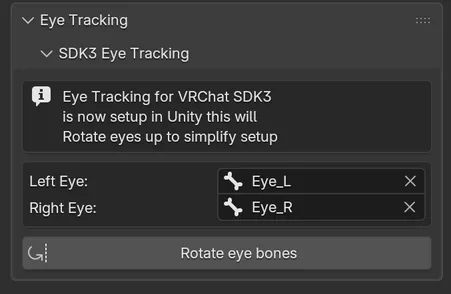
Section titled “SDK3 Eye Tracking”For VRChat, all Cats has to do is point the eye bones straight up with no roll. Unity’s eye look settings then behave the same on every model.
-
In Left Eye and Right Eye, pick the model’s eye bones. After Fix MMD Model they are named
Eye_LandEye_R. -
Click Rotate eye bones.
Cats reports Eye bones rotated., or Eye bones are already rotated for VRChat, no changes were made. if there was nothing to do. It keeps each bone’s head where it was, disconnects child bones that were attached to the eyes, and turns X-Axis Mirror back on afterwards if you had it on.
The button is disabled until both eye bones are set. If another object is in Edit mode, exit it first or open the armature in Edit mode.
Legacy Eye Tracking
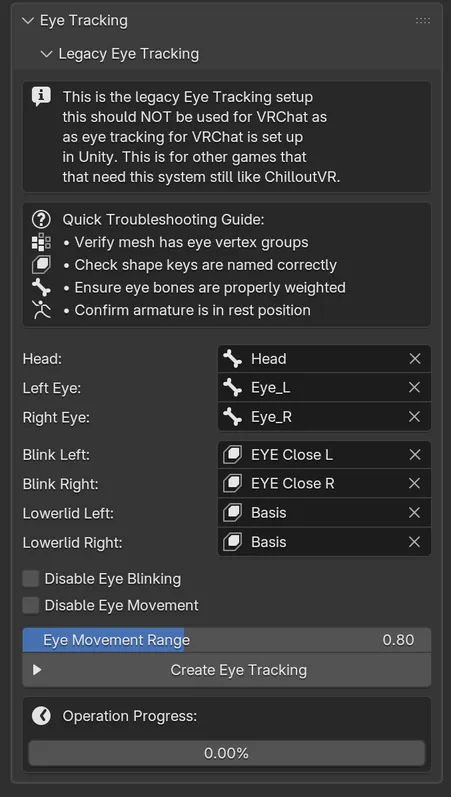
Section titled “Legacy Eye Tracking”The legacy setup adds eye movement and blinking through bones and shape keys. It has two modes: you create it, then Cats switches the panel to testing.
Requirements
Section titled “Requirements”Cats checks these before it starts, and stops at the first one that fails:
- The mesh with the eyes is parented to the armature and has shape keys.
- The mesh has vertex groups for both eyes, with names containing
LeftEye,Eye_L,eye.L,EyeLeft,left_eyeorl_eye, and the right-side equivalents. - The Head, Left Eye and Right Eye bones exist in the armature.
- The bone chain runs exactly Hips > Spine > Chest > Neck > Head.
- For the game to find it, the armature must be named
Armatureand the mesh with the eyesBody. Cats renames the armature toArmaturewhen it creates eye tracking, and Join all meshes in Quick Access names the joined meshBody.
Do any decimation before this step. Cats creates new eye bones from the current vertex groups, so later mesh changes can break them.
Create it
Section titled “Create it”-
Pick the Mesh with the eyes, if there is more than one.
-
Set Head, Left Eye and Right Eye to the existing bones.
-
Set the four shape keys:
Field Shape key Blink Left The left eye closed. Blink Right The right eye closed. Lowerlid Left The left lower lid slightly raised. Set it to Basisto skip lower lid movement.Lowerlid Right Same for the right side. -
Adjust the options if needed:
- Disable Eye Blinking keeps only eye movement. Cats still creates the blink keys, but empty.
- Disable Eye Movement keeps only blinking. You cannot tick both.
- Eye Movement Range (default
0.8) sets how far the eyes can turn. Too little or too much makes them glitch.
-
Click Create Eye Tracking.
Cats creates two new bones, LeftEye and RightEye, parented to Head and pointing up. Each new bone is placed between the old eye bone and the centre of the eye mesh, depending on Eye Movement Range. It then copies the eye vertex groups to the new bones and builds vrc.blink_left, vrc.blink_right, vrc.lowerlid_left and vrc.lowerlid_right from your shape keys, replacing older ones with the same names.
When it succeeds, it reports Created eye tracking! and the panel switches to testing. If the bone chain is wrong, Cats names the bone that is not parented correctly and stays in creation mode.
Test it
Section titled “Test it”- Click Start Eye Testing. Cats enters Pose mode, resets every pose and hides every bone except the two eyes.
- Move Up - Down and Left - Right to look around. The values are in degrees.
- If the eyes go too far or not far enough, change Eye Movement Range and click Set Range. Cats moves the eye bones again and keeps the new range.
- Click Reset Rotation to look straight ahead again.
- Set Blink Strength and click Test next to it to preview both blink keys together.
- Do the same with Lowerlid Strength for the lower lids.
- Click Reset Shapes to set every shape key back to 0.
Click Stop Eye Testing when you are done: it unhides the bones, clears the test pose and returns to Object mode. Reset Eye Tracking Panel takes the panel back to creation mode. In the game or engine, remember to assign LeftEye and RightEye as the eye bones.
Troubleshooting
Section titled “Troubleshooting”The panel keeps a short checklist, and it covers most failures:
- The mesh has eye vertex groups, with the names listed above.
- The shape keys are named correctly and selected in the fields.
- The eye bones are actually weighted to the eyes. In Pose mode, rotating them should move the eyes.
- The armature is in rest position.
If Set Range reports that a bone has no vertex group or no vertices assigned, you picked the wrong mesh or the wrong bone, or the meshes were not joined before creating eye tracking.